Upgrading My DS923+ NAS RAM - From 4GB to 32GB in My Homelab
02 Feb 2025I recently upgraded my Synology DS923+ from the factory 4GB to 32GB. In this post, I’ll walk you through why I made the upgrade, how I chose the right memory modules, the installation process, and the performance gains I’ve seen so far.
Why Upgrade?
- Performance Boost & Caching: Increasing the RAM in your NAS dramatically improves overall performance. More memory enhances caching, leading to snappier file transfers and smoother operation of applications like Docker.
- Future-Proofing Your Homelab: As my homelab grows—with more Docker containers and experimental projects—I need every ounce of performance available. Upgrading to 32GB now ensures that my system is ready for future demands.
Choosing the Right Memory
Before purchasing, I conducted thorough research:
- Community Feedback: I scoured the Synology RAM megathread on Reddit for success stories.
- Aggregated Data: I reviewed a Google Sheet listing user experiences to narrow down my options.
- My Selection: I chose the memory available on Amazon because it met all the necessary criteria (ECC, DDR4, compatible speed, and dual-rank configuration).
Installation Walkthrough
What You’ll Need:
- Synology DS923+ NAS (with the original 4GB installed)
- New RAM Modules: Replacing the 4GB module with a new 32GB setup.
- Anti-static Gloves & Proper Tools: Essential to prevent static damage.
Step-by-Step Process:
- Power Down & Disconnect: Shut down your NAS (hold the power button for 3 seconds until you hear a beep) and unplug it from the mains. I even removed the hard drives—keeping note of their order—to ensure everything stayed secure.
- Remove Existing RAM: Carefully eject the 4GB module using the side clips. Handle the memory by its edges.
- Install the New Modules:
Insert the new RAM sticks into the available SODIMM slots until they click into place.
Tip: Refer to this YouTube tutorial on installing memory if you need extra guidance.
-
Reassemble & Power Up: Replace the drives, reconnect all cables, and power on your NAS. Once booted, verify that the new memory is recognized on the Synology DSM dashboard.
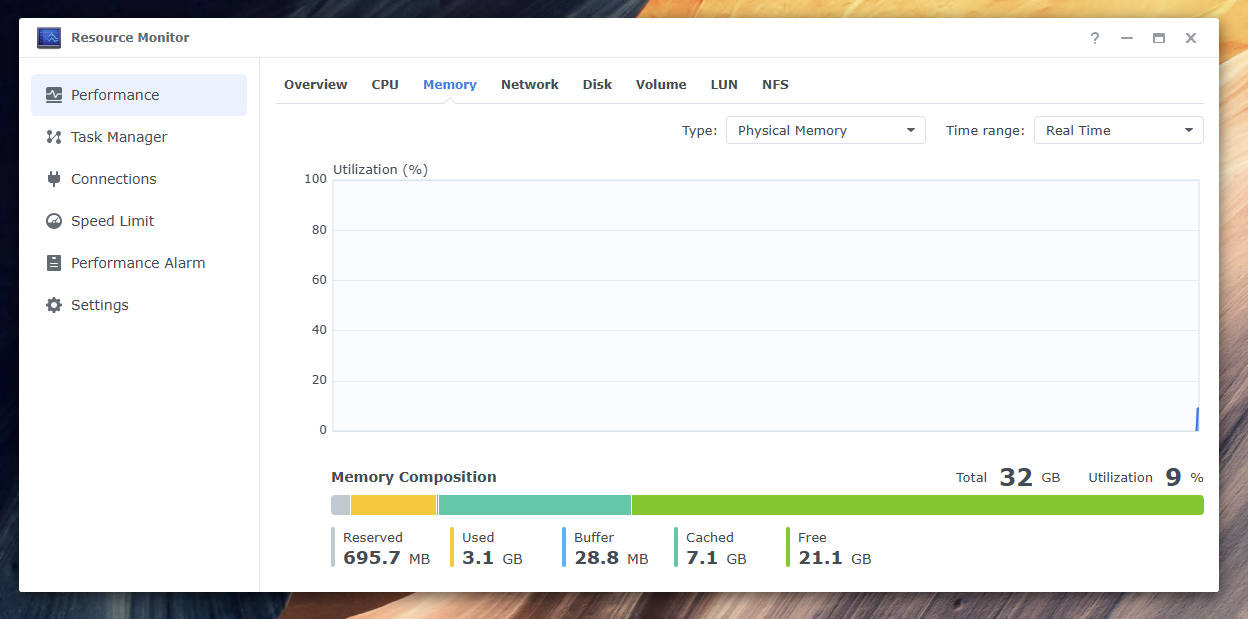 Screenshot showing the upgraded 32GB RAM and cache usage
Running the Memory Test
After installation, verify that the new RAM is functioning correctly:
- Using Synology Assistant: Download the Synology Assistant from the Synology Download Center and run the built-in memory test.
- Memory Test Guidance: I also followed this YouTube guide on running the memory test for additional insights.
Observed Improvements & Future Plans
Performance Gains:
- Faster File Transfers: The NAS now performs quicker indexing in Synology Drive and handles multitasking more fluidly.
- Enhanced Docker Experience: Enhanced reliability and responsiveness when running multiple Docker containers.
What’s Next?
- Deep Dive into Docker: Stay tuned for a follow-up post detailing Docker optimization techniques.
- Monitoring & Benchmarking: I plan to explore tools to track performance improvements over time.
Lessons Learned and Tips
- Double-Check Compatibility: Ensure the memory stick is ECC, operates at the correct speed (DDR4 2666 or 3200MHz), and is a dual-rank module if required.
- Handle with Care: Use anti-static precautions during installation.
- Leverage Community Insights: Utilize forums and shared spreadsheets for guidance on NAS upgrades.
Final Thoughts
Upgrading my DS923+ to 32GB has been a rewarding experience—improving performance and paving the way for future projects. I hope this guide helps you navigate your upgrade with confidence. Feel free to share your experiences or ask questions in the comments!
Happy upgrading!