02 Feb 2025
I recently upgraded my Synology DS923+ from the factory 4GB to 32GB. In this post, I’ll walk you through why I made the upgrade, how I chose the right memory modules, the installation process, and the performance gains I’ve seen so far.
Why Upgrade?
- Performance Boost & Caching:
Increasing the RAM in your NAS dramatically improves overall performance. More memory enhances caching, leading to snappier file transfers and smoother operation of applications like Docker.
- Future-Proofing Your Homelab:
As my homelab grows—with more Docker containers and experimental projects—I need every ounce of performance available. Upgrading to 32GB now ensures that my system is ready for future demands.
Choosing the Right Memory
Before purchasing, I conducted thorough research:
Installation Walkthrough
What You’ll Need:
- Synology DS923+ NAS (with the original 4GB installed)
- New RAM Modules: Replacing the 4GB module with a new 32GB setup.
- Anti-static Gloves & Proper Tools: Essential to prevent static damage.
Step-by-Step Process:
- Power Down & Disconnect:
Shut down your NAS (hold the power button for 3 seconds until you hear a beep) and unplug it from the mains. I even removed the hard drives—keeping note of their order—to ensure everything stayed secure.
- Remove Existing RAM:
Carefully eject the 4GB module using the side clips. Handle the memory by its edges.
- Install the New Modules:
Insert the new RAM sticks into the available SODIMM slots until they click into place.
Tip: Refer to this YouTube tutorial on installing memory if you need extra guidance.
-
Reassemble & Power Up:
Replace the drives, reconnect all cables, and power on your NAS. Once booted, verify that the new memory is recognized on the Synology DSM dashboard.
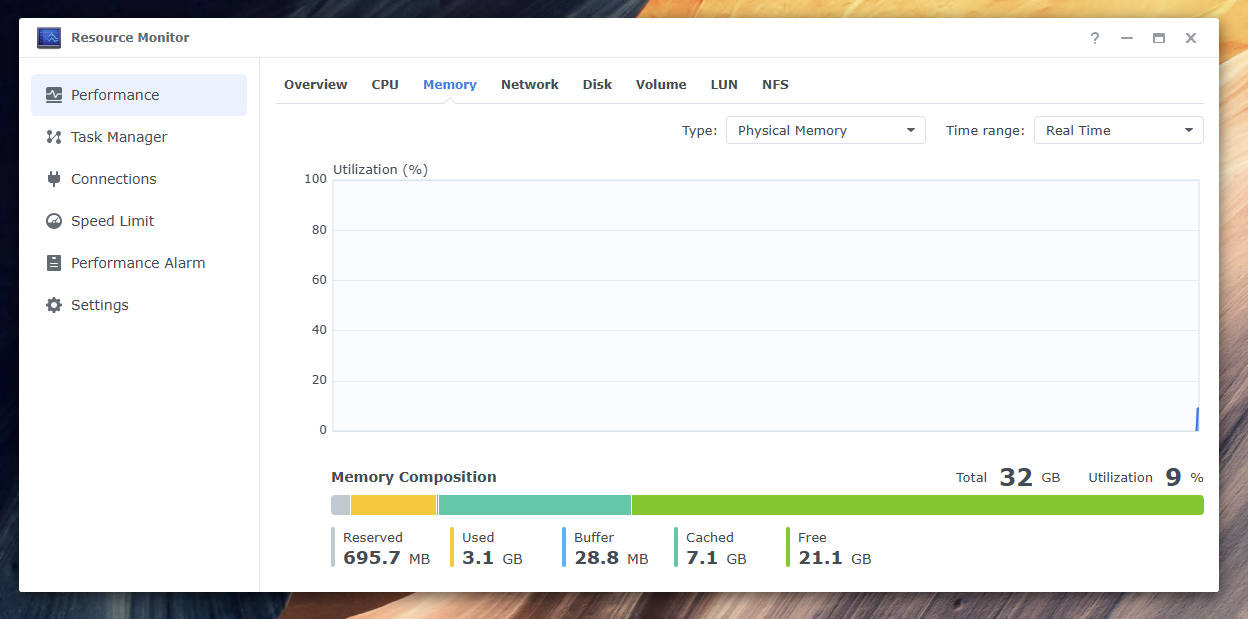 Screenshot showing the upgraded 32GB RAM and cache usage
Running the Memory Test
After installation, verify that the new RAM is functioning correctly:
Observed Improvements & Future Plans
- Faster File Transfers:
The NAS now performs quicker indexing in Synology Drive and handles multitasking more fluidly.
- Enhanced Docker Experience:
Enhanced reliability and responsiveness when running multiple Docker containers.
What’s Next?
- Deep Dive into Docker:
Stay tuned for a follow-up post detailing Docker optimization techniques.
- Monitoring & Benchmarking:
I plan to explore tools to track performance improvements over time.
Lessons Learned and Tips
- Double-Check Compatibility:
Ensure the memory stick is ECC, operates at the correct speed (DDR4 2666 or 3200MHz), and is a dual-rank module if required.
- Handle with Care:
Use anti-static precautions during installation.
- Leverage Community Insights:
Utilize forums and shared spreadsheets for guidance on NAS upgrades.
Final Thoughts
Upgrading my DS923+ to 32GB has been a rewarding experience—improving performance and paving the way for future projects. I hope this guide helps you navigate your upgrade with confidence. Feel free to share your experiences or ask questions in the comments!
Happy upgrading!
26 Mar 2024
Hi, it has been a while since I updated this blog.
To find my most recent updates, please follow my github profile at (https://github.com/jeffreywu1996) for some of the latest projects I am working on.
I will try to write up some blogs on deep diving into some of the projects when I find some time.
Some projects I am currently working on:
-
Microservice based barista service written with fastapi and postgres (https://github.com/jeffreywu1996/barista-order-service)
-
Eufy streaming security camera ML project (https://github.com/jeffreywu1996/eufy-video-streaming)
-
Virtual world with cars (https://github.com/jeffreywu1996/simulated-network-scenarios) - Need to move to new repo.
22 May 2018
I work quite a bit with python, it’s my go to language whenever I need to a quick script to get something done.
In this guide, I will talk about:
- manage python with homebrew
- virtualenv
- virtualenv wrappper
What’s Homebrew
Homebrew (link) is a package manager for MacOS. If you are familiar with linux, it is the equivilant of apt-get.
I use homebrew to install and update most of my development tools.
Installing python with Homebrew
Most modern system nowadays should have python installed but usually those python are never updated and are often outdated. You can check its version by typing python --version in your terminal.
On the MacOS, the default python used is installed by Apple. This version of python is severly outdated (In fact, Apple still uses python 2 which is deprecated now.)
To begin, you should have homebrew installed. (link to install here) If you have not done so, go to the link provided.
Next, simply type brew install python to install brew’s version of python. As of right now, brew automaticlly installs python 3 to the folder /usr/local/bin. (Default python is at /usr/bin).
To update python, just type brew update and brew upgrade. The update will download the new versions of its dependencies and the upgrade will actually upgrade to the new versions.
Virtualenv
Virtualenv allows you to have multiple different development environments. What this means is that I can have a project that uses python 2.7 while another uses python 3.2. Or I might want the old selenium library for legacy code while in another project I will want the newest one.
Virtualenv, or virtual environments, allow you to setup a temporary development environment for each python project.
To install, type pip install virtualenv virtualenvwrapper.
When you want to create a new virtualenv just type mkvirtualenv <env name> to initialize a new virtualenv. To activate it, type workon <env name>. To disable it, type deactivate.
So there you go, I’ll update this later to talk more about the virtualenv.
WIP.
23 Jan 2018
My computer has been running slow recently from the random junk I installed onto my computer from these couple of years. Besides that, my battery started to discharge really fast – Even the “service battery” warning came up on the battery indicator sign on the top right of the screen.
So I thought since I have a free weekend coming up, I might as well try and factory reset my entire macbook and see if things get better. It will also be a nice way for me to clean up my computer.
When the weekend came, I wiped the entire computer clean. I reformatted the entire disk to make sure nothing gets saved. I wiped it so clean that when I booted up, there was nothing left of the computer, no Apple logo nor a BIOS, only a question mark showed up. I had to reinstall my OS thru the network recovery mode (by pressing ctrl + command + r at startup).
That went ok, and eventually I got my macbook reset to look like it was just out the box. (Well at least software wise.) Once everything is wiped, I had to start installing all the stuff I need on my computer. This includes stuff like chrome, alfred, vlc, iterm, and sublime. After I got all that I had to install the packages I need in the terminal. Those went easy since there was homebrew. Remember how to setup my vim and its color scheme was a lot of work that I can make another
post on it next time.
But anyways, today I was working on a computer security puzzle called the Buffer Overflow Attack. What it is is also for another post in the future. But anyways, I needed to use gdb to look at the stack. However, when I tried to run gdb, I keep getting an error of the lines of “Unable to find Mach task port for process-id 39655: (os/kern) failure (0x5). (please check gdb is codesigned - see taskgated(8))”
This reminded me of how way back in sophmore year when I took the computer architecture class (CSE30) which was the first time I learned gdb. I remembered installing gdb on MacOS was a hassle.
Apparently, Apple does not allow programs to have that much of an access privilege that is needed for gdb. A program must be “code signed” for Apple to allow it to run.
Therefore, we had to “code sign” our gdb by creating a certificate saying that we should “trust” whatever program is in this certificate.
And here are the steps:
https://apple.stackexchange.com/questions/309017/unknown-error-2-147-414-007-on-creating-certificate-with-certificate-assist
23 Jul 2017
I never thought I would need to print out code on paper.
But that changed when my CSE 150 professor required us to turn in a hard copy of our source code for HW assignments. My first thoughts were the same as yours. why? lol. Isn’t turning it online much easier to grade?
But anyways, we just do whatever the professor wants us to right?
This seemed like a easy problem at first. I just go in my editor -> File -> Print. Easy right? Turns out no, or I wouldn’t write this post. My editor vim did not have the print option since is wrapper inside the terminal. Then, I thought, maybe sublime text would have the option to print code. And then again, it didn’t. Thus, I was stuck. But I still had to turn in my HW.
So I thought of a stupid and naive way, I just screenshot parts of my code as pictures and paste them in the word document and print.
This is what it look like. It got the job done, but it looked freakish. The image sizes were different so the code size were disproportionate and I hated it.
Then, after a couple unsuccessful searches on how to print out code on google (turns out not a lot of people still print code). I figured, vim must have some sort of way to do this.
I found two commands :TOhtml and :hardcopy > out.ps.
:TOhtml outputs a html version of the code that looks exactly like how it looks on my vim editor. Coloring, code highlighting and line numbers are all there. All I had to do is to open the html file with chrome and print from chrome.
:hardcopy > out.ps outputs a postscript file of the code. This code looks different from vim, but it still outputs.
The default settings did not print with line numbers so I had to add the line set printoptions=number:y to my vimrc to get it to work. Overall, I feel this is uglier than TOhtml which looked exactly the same as my terminal.
 This is the code in my editor vim.
 This is the output using
 :TOhtml
 This is the postscript output using
 :hardcopy
Both options were native to vim and they both work fine. If you have a nice looking terminal colorscheme, then, :TOhtml will be the choice for you. If you have an ugly terminal, don’t worry, :hardcopy got you covered.
The takeaway from this experience is that vim really has every feature you would ever need.